Drywall, a common construction material in most homes, is both versatile and durable. However, despite its resilience, it is susceptible to damage due to improper handling and installation mistakes.
What Are Some Possible Mistakes that Can Lead to Drywall Repair
Understanding these mistakes is the first step toward avoiding unnecessary drywall repairs. Let’s dive into some of the common errors that can lead to drywall damage and drywall repair.
1. Incorrect Installation
Faulty drywall installation is a prime cause for future issues. Incorrect alignment of panels, poor fastening, or over-tightening of screws can cause visible seams, nail pops, or even cracks. Using the right fasteners and ensuring that screws are driven to the correct depth can prevent such problems.
2. Insufficient Preparation
Before installing drywall, all electrical, plumbing, and insulation work should be completed. Installing drywall prematurely can result in having to cut or drill into it later to accommodate these services, leading to potential damage.
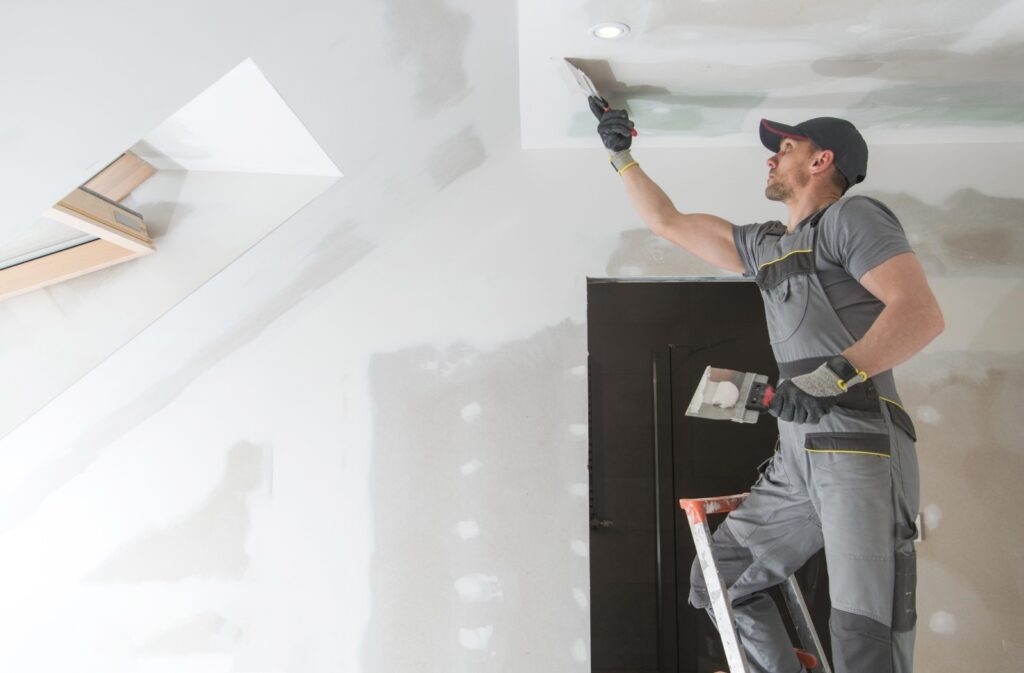
3. Poor Taping and Mudding
Taping and mudding are vital for achieving a seamless finish on drywall. Hastily done or poor-quality work can lead to visible tape, bumps, or cracks in the finish. Applying multiple thin layers of joint compound and letting each dry completely before adding the next can ensure a smooth finish.
4. Improper Cutting Techniques
Drywall requires cutting for fixtures, switches, or outlets. Using the wrong tools or techniques can lead to uneven cuts, breakage, or excess material removal. Always use a sharp utility knife and a straight edge to make precise cuts.
5. Not Accounting for Moisture
Drywall is not designed to withstand prolonged moisture exposure. Installing it in damp areas without appropriate moisture-resistant properties can lead to swelling, mold growth, and structural damage. Use specially designed drywall products for high-moisture areas like bathrooms and basements.
6. Ignoring Protection Measures
Drywalls can be damaged by frequent impacts, especially in high-traffic areas. Failing to install corner guards or door stoppers can result in dents or holes that need repair. Take preventative measures to protect your drywall, especially around furniture and fixtures.
7. Painting Without Priming
Painting drywall without a primer can led to uneven absorption and a blotchy appearance. Over time, it can also lead to paint peeling off, necessitating repair. Always apply a primer-sealer before painting new drywall.
8. Neglecting Minor Damages
Small cracks or holes may seem insignificant but ignoring them can lead to more serious issues over time. Water can seep through, affecting the structural integrity of the drywall and potentially causing mold growth. Address minor damages promptly to avoid more extensive repairs later.
9. Attempting DIY Without Proper Knowledge
While it’s tempting to tackle drywall installation or repair as a DIY project, a lack of experience and understanding can result in mistakes. It’s often wiser to call a professional, especially for large projects, to ensure the job is done right.
10. Lack of Regular Maintenance
Like every other part of your home, drywall requires regular maintenance. This includes cleaning, occasional repainting, and timely repairs. Neglecting regular upkeep can result in damage that could have been easily avoided.
Conclusion: What Are Some Possible Mistakes that Can Lead to Drywall Repair
Most drywall damage is a result of common mistakes during installation or regular use. By understanding these errors and learning how to prevent them, you can ensure the longevity and aesthetics of your drywall. Remember, sometimes calling a professional is the best way to avoid costly repairs down the line.
Stucco, a versatile and durable exterior finish, is a popular choice among homeowners looking to elevate their home’s aesthetic appeal. However, achieving a flawless stucco finish requires a professional touch.
How to Choose the Right Stucco Contractor for Your Home Project
This article will guide you through the process of choosing the right stucco contractors in Phoenix for your home project.
1. Define Your Project Requirements
Before you begin your search, clearly outline your project requirements. Are you looking for a new stucco installation, repairs, or a specific type of stucco finish? A clear understanding of your needs will enable you to choose a contractor with the right expertise.
2. Research and Shortlist Potential Contractors
Begin by searching for contractors in your local area with positive reviews and a strong reputation. Seek recommendations from friends, neighbors, or online review platforms. Make a list of potential candidates, considering their areas of specialization and past projects.
3. Verify Licensing and Insurance
Never skip verifying the contractor’s licensing and insurance status. A licensed contractor demonstrates adherence to local regulations and industry standards. Insurance, on the other hand, safeguards you against potential liabilities during the project. Most states have online databases where you can check a contractor’s license status.
4. Check Experience and Specialization
Experience is a crucial factor in choosing a stucco contractor. Look for contractors with several years of experience and a portfolio of previous projects like yours. Specialization in specific types of stucco or techniques might also be beneficial depending on your project’s nature.
5. Request for Estimates
Once you’ve shortlisted a few contractors, ask for detailed estimates. This should include the cost of materials, labor, and any other associated expenses. Be wary of estimates that are significantly lower than others; it might be a red flag for low-quality work or materials. Remember, the goal isn’t to find the cheapest service, but the best value for your money.
6. Check References and Reviews
A reliable stucco contractor should be willing to provide references from past clients. Take the time to contact these references and ask about their experience. You can also check online reviews and ratings on platforms like Google and Yelp for additional insights.
7. Assess Communication and Professionalism
Effective communication is key in any home improvement project. Choose a contractor who listens to your needs, answers your questions clearly, and keeps you informed throughout the project. Their level of professionalism can often reflect the quality of work you can expect.
8. Review Contract Details
Before finalizing your choice, make sure to review the contract carefully. It should detail the project’s scope, estimated cost, payment schedule, start and completion dates, and procedures for changes or disputes. Ensure you understand and agree to all terms before signing.
9. Post-Project Support
Lastly, ask about the contractor’s warranty terms and post-project support. A good contractor stands by their work and helps even after the project is complete.
Conclusion: How to Choose the Right Stucco Contractor for Your Home Project
Choosing the right stucco contractor involves careful research, proper vetting, and a clear understanding of your project needs. Take your time and don’t rush the process. A professional, reliable contractor will provide high-quality workmanship that enhances the value and appeal of your home, making the effort to choose wisely well worth it.
The popcorn ceiling, popular in homes built from the 1950s to the 1980s, is notorious for its textured, lumpy appearance resembling popcorn. While it was once loved for its ability to dampen noise and hide imperfections, it’s often seen as dated and unsightly in modern homes.
Ways to Remove Drywall Popcorn Ceiling
If you’re ready to say goodbye to your popcorn ceiling, here’s a guide on how to remove it safely and efficiently. You can follow the popcorn ceiling removal Edmonton.
1. Safety First
Before starting, protect yourself with the appropriate gear. This includes a respirator mask, safety goggles, and disposable coveralls. Also, note that popcorn ceilings installed before the 1980s may contain asbestos, which is hazardous when airborne. If your home falls into this category, consider hiring a professional or having a sample tested for asbestos before proceeding.
2. Prepare Your Room
Start by removing all furniture from the room. If this is not possible, cover the furniture with plastic sheeting. Protect your floor with heavy-duty plastic and secure it using painter’s tape. Switch off power at the circuit breaker and remove any ceiling fixtures.
3. Wet the Ceiling
Wetting the popcorn texture before scraping it off can make the process easier and less dusty. Using a pump sprayer, apply a fine mist of water to a small section of the ceiling. Wait about 15 minutes for the water to soak in. Be careful not to over-wet the ceiling, as too much water can damage the drywall or cause it to sag.
4. Scrape Away the Popcorn Texture
Use a wide putty knife or a drywall taping knife to gently scrape away the texture. Push the knife away from you, holding it at an angle to avoid gouging the drywall. Remember to work in small sections, rewetting the ceiling as necessary.
5. Sand and Clean the Ceiling
After you’ve scraped off all the popcorn texture, sand the ceiling to smooth out any rough spots. Use a pole sander with medium-grit sandpaper for the best results. Then, using a damp cloth, wipe down the ceiling to remove any residual dust before painting.
6. Repair Any Damages
Removing the popcorn texture may reveal imperfections or cause minor damage to the drywall. Use a joint compound to patch up any holes or cracks. Allow the compound to dry, then sand it smoothly.
7. Prime and Paint
Before painting, apply a primer to ensure the paint adheres properly and provides a consistent finish. Once the primer is dry, you can paint the ceiling in your chosen color. Consider using a roller with an extended handle to make the job easier.
8. Clean Up
Finally, carefully roll up the plastic sheeting with the debris inside, being careful not to let any dust escape. Dispose of it according to your local regulations.
Conclusion: Ways to Remove Drywall Popcorn Ceiling
Removing a popcorn ceiling can be a labor-intensive task, but the result is often worth the effort, offering a modern and clean look. Remember to prioritize safety, particularly regarding asbestos, and don’t hesitate to call in a professional if needed. With patience and care, you can successfully update your ceiling and increase the value and appeal of your home.


Recent Comments